First step to the design of simple VPN August 29, 2008
Posted by Ravindu Jayalath in Technical.add a comment
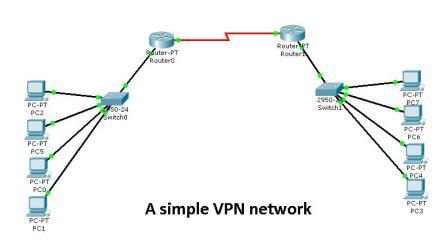
As the first step of configuring a small VPN you can connect two routers as shown in the diagram which is called Back-to-back connection and connect two switches to two Routers and you can connect your PCs to the both switches. As you all know Router a Layer 3 device seperates the broadcast domain. So you have to assign two different network addresses to the both sides.Now lets see the configuration. Since this is your first step we are not going to do any configuration to the switches as we don’t consider any VLAN or other advance options at the moment. In this topic we mainly consider about the router configurations. Here we go…
Router 0:
interface FastEthernet0/0
ip address 192.168.10.254 255.255.255.0
no shut
interface Serial2/0
ip address 10.0.0.1 255.255.255.0
no shut
ip route 192.168.11.0 255.255.255.0 10.0.0.2
copy run start
Router 1:
interface FastEthernet0/0
ip address 192.168.11.254 255.255.255.0
no shut
interface Serial2/0
ip address 10.0.0.2 255.255.255.0
clock rate 64000
ip route 192.168.10.0 255.255.255.0 10.0.0.1
copy run start
Since we use back to back configuration we need to provide the clocking to the DCE interface of the router using clock rate command which you do not need to do in reality as your CSU/DSU provide clocking there.
Then you will have to configure the IPs of the PCs according to the network addresses that we used in router ethernet interfaces and defaulte gateways of that PC should be the IP of the ethernet interface of that router. Here I have shown you only the basic configurations only. Other than this the usual configurations sucha as assignig passwords and descriptions and so on to be done.
Then you need to make sure whether everything is done correctly. Here we do that.
Router#sh ip int brief
Interface IP-Address OK? Method Status Protocol
FastEthernet0/0 192.168.11.254 YES manual up up
Serial2/0 10.0.0.2 YES manual up up
Router#sh ip route
10.0.0.0/24 is subnetted, 1 subnets
C 10.0.0.0 is directly connected, Serial2/0
S 192.168.10.0/24 [1/0] via 10.0.0.1
C 192.168.11.0/24 is directly connected, FastEthernet0/0
As you can see assigning IP and configuration of routing are done. Since we have limited number of networks here we don’t use any routing protocol to configure routing. We will see them later.
Ok then you are done. Try to ping from one side PC to other side PC. You can do it now as we do not block pings here. We will talk about how to block things such as ping and how to firewall the network later.So you can ping right?Have fun.
–Thank you for reading & hope you have got something–
–do not complain if you already know because I can’t help for that–
RED HAT LINUX-Installation & configuration for servers August 29, 2008
Posted by Ravindu Jayalath in Technical.add a comment
 When we talk about open source specially about the Linux OS,the installation and deployments are very important.Proper installation is highly require to maintain an efficient network.Here are some basic steps to follow out the installation.
=>Choose Language-English
=>Keyboard Type-US
<Use prefered installation method>
Disk partitioning layout-Create custom layout(Important)
Disk Partitioning tables
/boot –fstype ext3 –size=100MB -as primary
Volume Group vg00 (LVMv2)
swap –size=8GB(usually 1.5 times RAM)
/ –fstype ext3 -size=4GB
/var –fstype ext3 -size=3GB
/usr –fstype ext3 -size=10GB
/tmp –fstype ext3 -size=2GB
/home –fstype ext3 -size=80GB
Keep rest of the disk space as spare in Volume Group
Use Default GRUB boot loader
No boot loader(GRUB)password-Assuming high physical security
Network
Use static IPv4 and gateway,DNS accordingly
Select Time Zone(for servers better GMT)
Software Installation(As u preffer-do not need much to a server)
Firewall – Disabled
SELinux – Disabled
Make sure ssh is enabled.
–Thank you for reading & hope you have got something–
